Adjusting the spray pressure can help tailor your WashR PRO to different cleaning jobs — but it’s important to know when (and if) you should adjust it at all.
⚠️ Important Info by Region:
🇺🇸 USA & Canada (110v Systems):
Due to power limitations of 110v systems, spray pressure adjustment is not available on WashR PRO units in the USA and Canada.
Your unit is already optimised for best performance out of the box. No further adjustment is possible or necessary.
🌏 Australia & Other 240v Regions:
While the WashR PRO does allow spray pressure adjustments in 240v systems, we don’t recommend adjusting it.
Your unit has been factory-tuned for the ideal balance of PSI and flow specifically for detailing work. That means:
-
Maximum cleaning efficiency
-
Safe use on paint and trims
-
No need to tinker with settings
However, if you want to lower the pressure for very delicate surfaces, here's how to do it:
🛠️ How to Adjust Spray Pressure (For 240v Regions Only)
1. Select & Install the Right Nozzle
Start by choosing the correct high-pressure nozzle for your task and attach it securely to the spray wand.
2. Maintain Safe Distance
Keep a safe distance from the surface while spraying — closer means more pressure, so distance matters too.
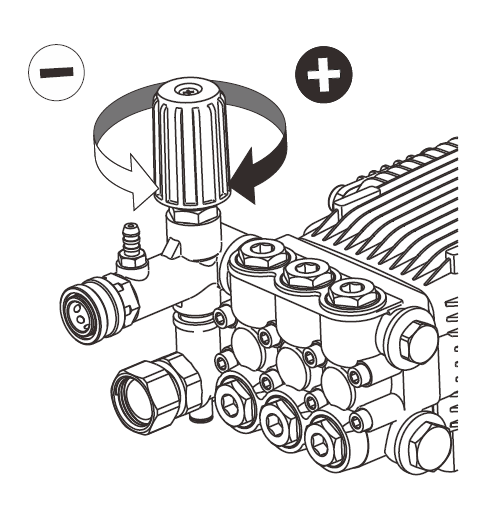
3. Adjust the Pressure Knob
4. Test the Pressure
Spray a small, inconspicuous area first. Check for any signs of damage or lifting. If all looks good, you’re safe to continue.
5. Rinse Methodically
Start from the top and work your way down in overlapping strokes, just like you would when cleaning.
✅ Final Tip:
In most cases, you don’t need to adjust the pressure — it’s already dialled in for premium detailing results.
Still unsure or need help? Reach out to our support team. We're here to make sure you're getting the most out of your WashR PRO, no matter where you are.

