
Welcome to the bigboi Help Centre
Your Source for Expert Advice, Troubleshooting, and Product Information
- WashR PRO20 Manual
- D-IonizR GO Manual
- WashR TRADIE Manual
- SuckR MINI PLUS Manual
- D-IonizR Wheelbase Instructions
- WashR Quad Manual
- WashR PRO & DUO 2 in 1 Wall Mount Manual
- WashR PRO & DUO Fixed Wall Mount Manual
- SuckR PRO+ Manual
- BlowR ChargD Manual
- BlowR Hose Reel Manual
- BlowR PRO Manual
- BlowR PRO+ Manual
- D-IonizR 1 Manual
- D-IonizR 2 Manual
- SuckR MINI Manual
- XtractR Mini Manual
- BlowR Buddi JNR Manual
- BlowR Buddi Manual
- BlowR Mini Manual
- BlowR Mini+ Manual
- SuckR PRO Manual
- WashR DUO Manual
- WashR FLO Manual
- WashR PRO Manual
- WashR PRO & DUO | How to Change Your Oil
- WashR DUO | For the TSS Version only. No water delivery when gun trigger is depressed
- WashR DUO | For the TSS Version only. The motor starts even with gun trigger is released
- WashR DUO | How to adjust your spray pressure
- WashR DUO | How to maintain your unit (Maintenance Guide)
- WashR DUO | How to setup the unit
- WashR DUO | How to start the unit
- WashR DUO | How to store the unit when not in use
- WashR DUO | How to use your nozzles correctly
- WashR DUO | Is experiencing a water leak
- WashR DUO | The motor does not start when switched on
- WashR DUO | The pressure drops during use
- WashR DUO | The pressure fluctuates
- WashR DUO | The pump is noisy
- WashR DUO | The pump is running but does not reach the working pressure
- WashR DUO | The unit has an oil leak
- WashR DUO | There is the presence of water in the oil
- WashR DUO | What is the RED cap installed in the valve manifold?
- WashR DUO | When I switch on the unit, the motor hums but does not run
- WashR DUO | How to stop the unit
- WashR DUO | How to check your oil level before use
- WashR PRO | Correct use and storage of an extension cord
- WashR PRO | Why is my pressure washer leaking?
- WashR PRO & DUO | How to Change Your Oil
- WashR PRO | What is the recommended size of the office for the foam cannon?
- WashR PRO | For the TSS Version only. No water delivery when gun trigger is depressed
- WashR PRO | For the TSS Version only. The motor starts even with gun trigger is released
- WashR PRO | How to Adjust your Spray Pressure
- WashR PRO | How to check your oil level before use
- WashR PRO | How to maintain your unit (Maintenance Guide)
- WashR PRO | How to setup the unit
- WashR PRO | How to Start the unit
- WashR PRO | How to Stop the unit
- WashR PRO | How to store the unit when not in use
- WashR PRO | How to use your Nozzles correctly
- WashR PRO | Is experiencing a water leak
- WashR PRO | Is making a beeping noise while running
- WashR PRO | Motor is still running even after releasing the trigger of the trigger gun
- WashR PRO | PCB Delete Kit Installation Instructions
- WashR PRO | Producing humming sound after turning on, and tripping the circuit breaker
- WashR PRO | Producing very low pressure?
- WashR PRO | Recommended wire gauge, AWG, if the unit will be connected to a power extension cord?
- WashR PRO | The current surged high while the WashR is starting up
- WashR PRO | The male connector connected to the inlet port is leaking?
- WashR PRO | The motor does not start when switched on
- WashR PRO | The pressure drops during use
- WashR PRO | The pressure fluctuates
- WashR PRO | The pump is noisy
- WashR PRO | The pump is running but does not reach the working pressure
- WashR PRO | The unit has an oil leak
- WashR PRO | There is the presence of water in the oil
- WashR PRO | What is the Recommended size of the orifice nozzle?
- WashR PRO | What is the RED cap installed in the valve manifold?
- WashR PRO | When I switch on the unit, the motor hums but does not run
- WashR FLO | Is the hose and gun covered by warranty
- WashR FLO | My unit is no longer turning on
- WashR FLO | My unit is not turning off
- WashR FLO | My unit turns off due to overheating
- WashR FLO | Why is my hose vibrating
- WashR FLO | Does not reach high enough pressure
- WashR FLO | How to set up your unit
- WashR FLO | Maintenance Guide
- WashR FLO | Motor refuses to start
- WashR FLO | Motor starts up but there is no working pressure
- WashR FLO | No detergent present
- WashR FLO | Output pressure varies high and low
- WashR FLO | Spray wand is leaking
- WashR FLO | The motor stops
- WashR FLO | The pump is very noisy
- WashR FLO | Water is leaking from the pump
- WashR FLO | How to turn your unit on and off
- SuckR PRO - How to sync your SuckR PRO with the XtractR KIT Remote
- SuckR PRO | How do you change your filter bag?
- SuckR PRO | How to avoid HEPA filter Issues
- SuckR PRO | How to setup the unit?
- SuckR PRO | My unit is not turning on
- SuckR PRO | Why is the unit not turning on
- SuckR PRO | How to Assemble the unit
- SuckR PRO | How to Use the Extraction Function (Kit Sold Separately)
- SuckR PRO | How to Use the Vacuum Function (Wet & Dry)
- SuckR PRO | Storage and Transportation
- SuckR PRO | Why Is My Engine Housing Overheating?
- SuckR PRO | Why Is the Suction Weakening? (Losing Power)
- SuckR PRO | How to maintain the unit (Maintenance Guide)
- D-IonizR GO Setup & Refilling Resin
- D-IONIZR | How to install the battery in your TDS meter
- D-IonizR | How to Use the Filter Guides
- D-IONIZR | I'm getting leaks from the inlet and outlets.
- D-IONIZR | Should I hand tighten or Wrench tighten my filters?
- D-IONIZR | The TDS metre does not turn on.
- D-IONIZR | What do I do with the tabs inside the housing?
SuckR PRO | How to Assemble the unit
How to Assemble the SuckR PRO
Step-by-Step Guide
Proper assembly of your bigboi SuckR PRO ensures optimal performance and ease of use. Follow the instructions below to assemble your vacuum cleaner correctly from the box.
1. Release and Remove the Cover
-
Unlock the latch (Pic.1) to release the cover (Pic.2).
-
Remove the included transport wheels and accessories.
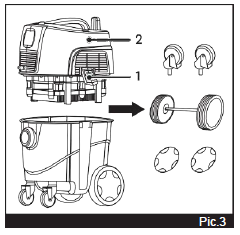
2. Install the Transport Wheels
-
Install all four transport wheels by pushing them into the designated slots at the base of the unit.
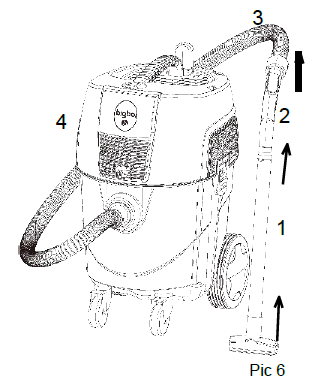
3. Connect the Extension Tube & Hose
-
Insert the extension tube (Pic.1) into one of the rods.
-
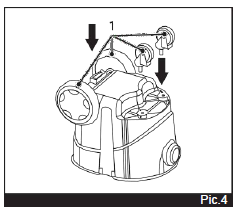
Install the hose (Pic.3) into the SuckR PRO’s connector (Pic.4).
-
Connect the hose to the rod using the provided connector (Pic.2).
-
Choose and attach the desired tool (sofa brush or crevice nozzle) depending on your cleaning needs.
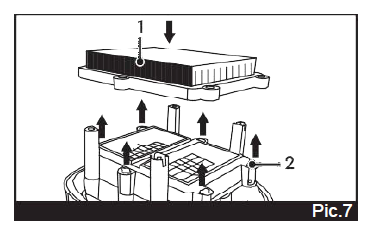
4. Install the Cassette Filter
-
Open the eccentric latches (Pic.2) on the SuckR PRO’s cover.
-
Insert the cassette filter (Pic.1) and secure it by locking the eccentric clamps.
-
If needed for dry vacuuming, install a paper filter bag inside the unit.
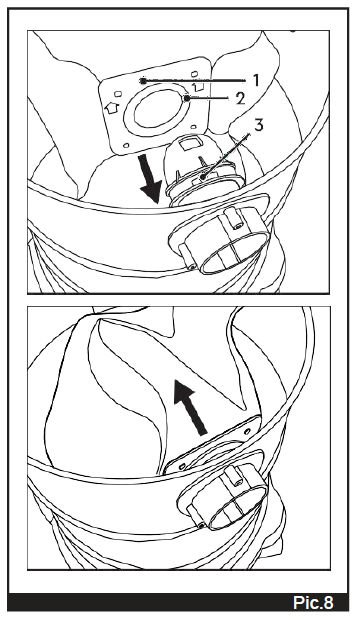
5. Install the Replaceable Dust Bag (Optional for Dry Use)
-
Mount the replaceable dust bag (Pic.1) onto the seat (Pic.3).
-
Ensure the rubber seal (Pic.2) is fully inserted into the corresponding groove.
-
Gently pull the bag in the opposite direction to verify it’s properly fitted and secure.
Final Tip
Once assembled, your SuckR PRO is ready for action. For best performance, ensure all parts are tightly connected and that the correct filter type is used for your task.
If you run into any setup issues, visit our Troubleshooting Guide or Contact Support for assistance.
Updated on 18 May 2026
What are your Feelings?
Thanks for your feedback
Fast Delivery
Ships Fast from Sydney
30 Day Guarantee
Up to 30 days to return your items if faulty
Payment 100% secured
Pay upfront or Pay in 4 with Afterpay or ZipPay
Customer service
Phone & Chat Support
Monday-Friday: 9AM-4PM
*Christmas in July Sale starts July 6th 9:00am AEDTSpend & Save promotion valid on orders placed during the Christmas in July sale period only. Minimum spend thresholds of $1,500 AUD and $2,500 AUD (excluding shipping) must be reached to qualify for 10% and 20% discounts respectively. Discounts are applied to the total order value at checkout. The Spend & Save discount excludes products already marked down or on sale. Offer valid while stocks last and cannot be combined with any other promotion or discount code. bigboi reserves the right to modify or withdraw this offer at any time. Additional terms, conditions, and exclusions may apply.
